When it comes to pinning a magazine to 10 rounds, there are two sides to the process: quick and easy, or slow and difficult. Many people find themselves stuck in the middle, unable to decide which route is right for them. But with these quick and easy tips, you’ll be well on your way to becoming a master of magazine-pinning in no time!
The aim of this article is simple: provide an overview of how to pin a magazine to 10 rounds quickly and easily. We’ll explore the steps involved, as well as offer helpful tips and tricks along the way. So whether you’re a beginner looking for an introduction into magazine-pinning or an expert looking for some fresh ideas, this article has something for everyone.
For those who are unfamiliar with the concept of magazine-pinning, let’s take a moment to break down what it is. Magazine-pinning is essentially a process where magazines are securely fastened onto 10 rounds so that they can be easily transported from place to place without slipping off or falling out. Let’s now dive into our quick and easy tips on how to get this done!
Table of Contents
Gather The Necessary Supplies
When reloading a magazine, it’s important to have the right tools on hand. Take the case of Sam, who was preparing for a day at the shooting range. He had his ammunition and gun ready, but he didn’t know how to pin his magazine to 10 rounds.
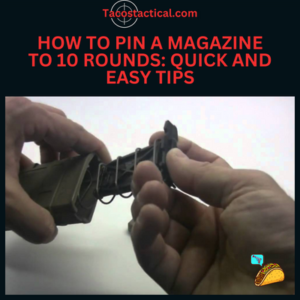
To get started, Sam gathered the necessary supplies: a punch tool and a hammer. With these simple tools, he could quickly and easily reload his magazine.
Next, Sam used the punch tool to create an indentation in the follower of the magazine. Then, he inserted a round into the indentation and tapped it in place with a hammer. To finish, he repeated this process until all 10 rounds were in place.
Sam was relieved that his reloading project was complete. His magazine was now pinned to 10 rounds—and he was ready for his day at the shooting range!
Prepare The Magazine
Before you can pin the magazine, you need to get it ready. This step is simple – but important. Here’s how to do it:
- Check the pages and make sure they’re all intact.
- Lay the magazine on a flat surface and press down so it lays flat.
- Pull out any old fasteners that are already in place.
- Make sure there’s no dust or dirt on the magazine by wiping off with a cloth.
Now your magazine is ready for the next step: selecting a fastener. Preparing the magazine doesn’t take long, but it’s essential for success. An unprepared mag won’t lay flat and may not hold up over time. So take your time to ensure all pages are in place and free of dirt or dust before fastening your round-up! Ready? Let’s move on to the next step.
Select A Magazine Fastener
Selecting the right magazine fastener is essential. It’s important to find one that fits your gun model and magazine capacity. There are two types: rivet-style and adhesive-style. Rivet-style fasteners use an aluminum pin that fits through pre-drilled holes in the magazine body and floorplate, secured with a small nut. Adhesive-style fasteners use a strong adhesive backing to attach the magazine to the floorplate.
Rivet-style fasteners are usually more secure but they take longer to install. Adhesive-style fasteners are easier to install but may not be as durable in extreme conditions, like high temperatures or repeated firing cycles. It’s important to choose the right type for your application.
Whatever you choose, make sure it’s easy to remove when necessary for cleaning or maintenance purposes. Taking the time to select a secure and reliable magazine fastener will help ensure your rounds stay in place during loading and unloading safely and securely. Now it’s time to attach the magazine fastener of choice.
Attach The Magazine Fastener
It was as if the clock had stopped ticking. Attaching the magazine fastener was a daunting task that seemed to take forever and ever. But with a few easy steps, the process could be a breeze!
First, remove any pieces of plastic from the fastener and place it on top of the magazine. Take your time to make sure the fastener is aligned correctly with the magazine. Then, use a hammer or some other tool to firmly press down on each end of the fastener until it is completely secured in place.
The seconds slowly ticked by as I applied pressure, making sure that each side was secure. Finally, I could relax knowing that my magazine would stay perfectly in place for 10 rounds – no matter what!
Position The Magazine On The Target Board
Position the magazine on the target board. Place it where you want the magazine to stay. Make sure the holes of the magazine line up with those on the target board. This is critical for proper pinning.
Check that all edges of the magazine are aligned and secure against the target board. If not, adjust them carefully until they fit snugly in place.
Once positioned correctly, proceed to securing it in place using fasteners or screws. Ensure each hole is properly filled and secured before moving onto the next one. Take your time while doing this and double-check each fastener before continuing to ensure a strong hold of the magazine to the target board. Transition into next step without saying ‘step’ smoothly and confidently.
Secure The Magazine To The Target Board
Secure the magazine to the target board. This is a necessary step to ensure that it remains firmly in place. Place one hand on top of the magazine and use your other hand to secure it with pins on both sides. Make sure the pins are evenly spaced and placed in a downward direction. When you have secured the magazine, check that it is securely fastened to the board before proceeding.
To make sure everything is properly secured, place your finger behind each pin and give it a slight tug. If it doesn’t move, then you know all of the pins are firmly placed. Then, double-check that all of the pins are angled correctly so they won’t slip out over time. Doing this will make sure your magazine stays pinned for as long as you need it to be.
Once all of the pins are securely in place, you can move onto locating pinning points for your next step. To do this accurately and efficiently, use a ruler to measure where each pin should go on the board before actually placing them. This will help ensure that every pin is placed exactly where it needs to be for optimal security.
Locate The Pinning Points
Once you have secured the magazine to the target board, it’s time to locate the pinning points. This is an essential step as it helps determine where you should install the pins. Here are three tips for locating your pinning points:
- Measure twice, pin once. It’s important to make sure you accurately measure the distance between each point.
- Use a ruler or measuring tape. Doing so will help ensure that all of your pinning points are evenly distributed and at the same height.
- Mark your pinning points with a pencil or marker. Doing this will help create a visual reference for when you’re ready to install the pins. It’s important to remember that finding the right pinning points takes precision and accuracy – but don’t worry, it’s not as hard as it seems! With these tips in mind, you’ll be able to easily locate your pinning points and move onto installing the pins with confidence.
Install The Pins
Installing pins is like a game of darts. You must be precise and know where to aim. Carefully identify the pinning points on the magazine and place the pins accordingly.
Begin with one pin at each corner, then work your way around the magazine until you have placed all ten pins into their designated spots. Take extra caution not to push too hard in order for them to remain secure and properly aligned. Aim precisely, as if you were a pro dart player, so that all the pins fit snugly in their respective slots.
Check each pin to make sure they are securely fastened before moving onto the next step. It is important that they are evenly spaced out and fully installed so that your magazine will be able to carry 10 rounds safely and effectively.
Load The Magazine Into The Magazine Carrier
Once the pins are installed, it’s time to load the magazine into the magazine carrier. It’s important to ensure that all rounds are in place properly; otherwise, your gun may jam when you shoot. Here’s how to do it:
- Hold the magazine between your thumb and forefinger.
- Place the rounds into their respective slots one at a time.
- Make sure each round is seated correctly before loading another one.
When done correctly, it should feel snug and secure with no loose rounds rattling around. Once all 10 rounds are loaded, double-check that all rounds are in place and secure before moving onto the next step. Now it’s time to test the magazine on the target board.
Test The Magazine On The Target Board
Picture a magazine, ten rounds held tightly in its arms. It’s ready to go, just waiting to be tested on the target board. Sure, it looks intimidating, but pinning a magazine to 10 rounds is actually quite simple – as long as you follow these quick and easy tips:
- Securely attach the magazine to the firearm
- Load the magazine into the magazine carrier
- Test the magazine on the target board
Time to test that mag. Place it in the board and make sure it’s secured firmly. Take aim and fire those rounds. Reload if needed. Keep an eye out for any issues like jams or misfires. If all is good, move on with confidence; your mag’s ready for action!
This process may seem tedious at first, but with practice you’ll soon have it down pat. In no time you’ll be able to pin a magazine to 10 rounds like an old pro. See? Nothing to stress over – just follow these easy steps!
Frequently Asked Questions
How Long Will It Take To Pin A Magazine To 10 Rounds?
It’s a piece of cake to pin a magazine to 10 rounds, but how long will it take you? Well, that all depends on your level of experience. If you’re an experienced shooter, it can be done in a flash. But if you’re new to the gun game, it could take some time to get the job done.
To start off on the right foot, make sure you have all the necessary tools and supplies at hand. Have your trusty pliers and some strong glue handy so you can securely attach the magazine to the rounds. And don’t forget to read up on safety guidelines before tackling this task – better safe than sorry!
Once everything is ready, the actual process goes pretty quickly. Place each round into its corresponding slot in the magazine and press down firmly with your pliers until they’re securely attached. You’ll know you’ve got it right when they stay put without wobbling around or detaching themselves. All in all, pinning a magazine to 10 rounds should take no more than ten minutes – easy peasy!
What Type Of Magazine Should I Use?
“The right tool for the job” – this ancient adage rings true when it comes to pinning a magazine to 10 rounds. Selecting the right magazine can be just as important as knowing how to do it. How, then, should one choose?
When selecting a magazine, look for one that is made of sturdy material and is lightweight. Plastic-coated steel magazines are a good choice for their durability, but they can add extra weight to your firearm. Aluminum alloy magazines provide a lighter option with good corrosion resistance. Both types will hold up over extended use with proper maintenance.
In addition, make sure the magazine fits your firearm correctly before attempting to pin it. If it doesn’t fit properly, you may find yourself struggling to get the rounds in correctly or having difficulty with feeding issues. Additionally, consider purchasing additional magazines so that you have spares in case something goes wrong or if you need more rounds quickly.
Ultimately, choosing the right magazine when pinning 10 rounds isn’t only about convenience – it’s about safety too. With sturdy materials and proper fitting, you’ll be able to ensure that your firearm is prepared for use in any situation.
What Type Of Target Board Should I Use?
It’s time to get ready for your shooting session. Achieving accurate shots requires a dependable target board that’ll stand up to the challenge. To keep your magazine secure, you need to find the right material and setup.
Entering the shooting range is like stepping into an alternate universe. The air smells of gunpowder and anticipation as you scan the area for a suitable target board. Your eyes land on a variety of options: wooden boards, metal stands, and foam cutouts. Each has its own advantages and drawbacks when it comes to magazine pinning.
So, what type of target board should you use? Here are some materials to consider:
Wooden Boards:
Pros: Durable, easy to attach magazines with nails or staples.
Cons: Prone to damage from weather or moisture; can be expensive for larger sizes.
Metal Stands:
Pros: Rust-resistant; lightweight and portable; ideal for outdoor environments.
Cons: Can be prone to denting or bending; not suitable for heavy magazines due to their weight.
Foam Cutouts:
Pros: Lightweight, economical option; absorb shock from repeated shots; easy to transport and store away when not in use.
Cons: Not as durable as other materials; may require additional padding for heavier magazines.
The right material depends on your budget, needs, and preferences — so take time to explore each option before making your choice! With careful consideration, you’ll be able to select a reliable target board that will help you pin your magazine with ease — no matter how many rounds it takes!
Are There Any Safety Precautions To Consider When Pinning A Magazine?
Pinning a magazine to 10 rounds is like a game of puzzle pieces: it’s simple when you know what you’re doing, but can be tricky if you don’t. With that in mind, it’s important to consider the safety precautions to keep in mind when getting the job done.
First, take the time to understand how your firearms function and how they are safely operated. Make sure your firearm is unloaded before attempting any modifications or adjustments. Additionally, wear eye protection when pinning your magazine and ensure that all other safety measures are followed.
Next, use a sturdy target board that won’t move or shift during use. Avoid using softwoods for this task as they may splinter when shot at. It’s also important to make sure your distance from the target board is appropriate for safe shooting practice – usually around 25 yards away from the target board and further from bystanders or people nearby.
Finally, double check your work after pinning the magazine to ensure everything is in place and secure before beginning shooting practice. Taking extra steps like these will help protect both yourself and those around you while having fun with firearms.
Is There A Certain Way To Store The Magazine Once It Is Pinned?
Pinning a magazine to 10 rounds is an important task, one that requires some thought and care. But once the magazine is pinned, what’s next? Storing the magazine properly is just as important.
There are several considerations when storing a magazine with rounds pinned. First, you should make sure it is stored in a place away from heat or moisture, as this could cause the rounds to become unstable or misfire. Second, you want to store it in a secure location; if there are any children in your home, make sure they can’t access it. Third, be aware of any laws regarding how and where you can store firearms and ammunition; most states will have specific restrictions on this point.
Finally, check your pinned magazine regularly for signs of wear or damage; if necessary, replace it with a new one to ensure safety and accuracy. Following these steps will help you keep your pinned magazine in good condition for years to come.
Conclusion
Pinning a magazine to 10 rounds is an easy skill to master. It’s simple, fast, and can be done with minimal fuss. With the right materials and a little patience, you can have this task accomplished in no time.
I found that using heavy card stock or sturdy paper works best when pinning a magazine to 10 rounds. Make sure your target board is thick enough to accommodate the pins as well as the magazine. Safety is of utmost importance when working with tools like these; take all necessary precautions when handling sharp objects. The magazine should be stored flat to avoid any damage or wear and tear on the pages.
Overall, pinning a magazine doesn’t need to be complicated or time consuming; just remember to use the right materials and follow safety protocols. With just a few steps, you can easily get your magazine pinned in no time at all!

Founder of www.calisthenics-101.co.uk. Training calisthenics since 2012.
Currently working on: 30 second one-arm handstand, muscle-up 360, straddle planche.